Showing posts with label oya lace instruction. Show all posts

Tuesday, March 20, 2012

Igne Oyasi Tutorial

12 Comments

 So heres another tutorial, this time for Igne oyasi.  A simple yet pretty edging, easy enough to accomplish if you know the basics of oya.  This tutorial is step by step, any questions are welcome.

Once again I have taken the time to take these pictures, and explain what I'm doing for your benefit.  Please, link back to my profile if you in some way choose to post this tutorial on your website.  Its only fair!

Anyway on with the tutorial...
This is what we will be making today.

You will need:  2 colours nylon/polyester thread, a lighter, scissors and a sewing needle.

Make 2 zurafa (loops)

Going back on the 2nd loop make a knot

Make 4 pirpir (long loops)

Continue making zurafa (loops) 5 in total.

Going back on the 5th loop make a knot and repeat making 4 pirpir (long loops)
the above steps are repeated for the length desired.

With the 2nd colour make 3 zurafa (loops) over the 4 pirpir (long loops)

going back, knot in the 1st loop.

make 1 pirpir (long loop) in the same space

continuing forward make 2 zurafa (loops) over the 3 zurafa (loops) below.
you have now decreased. Well done haha.

Going back, make 1 pirpir (long loop) in the same space.

make 1 zurafa (loop) go back in that 1 zurafa (loop) and make 1 pirpir (long loop) in the same loop.

Make another pirpir (long loop) in the same space.

leaving a small amount of thread (enough so it doesn't distort) bridge to the 1st pirpir (long loop) on the row below
and make a knot and repeat the above steps again.

At the end cut your threads and burn them, I burn them so they dont unravel, but sometimes they leave black burnt bits but its up to you i suppose.


And so this is the tutorial!  Thanks for reading! x

Lets make a bead oya TOGETHER!

4 Comments

So I dont make many tutorials but I thought I would do this one just for the bead oya lovers out there. I will be divulging into the many uses of the oya made popular by Adele Recklies on her website which teaches what she has simply named "oya stitch" which I know to be Yillan Kemigi or Snakes Bone oya, which originated in my mother in laws home city of Konya in Turkey.  This oya can be made simply as it is and attached to a scarf, or can have more complicated designs where the "snakes bone" acts as a sort of band that holds the rest of the oya.  Today I will be showing you a basic tutorial simply called "eyebrow."  My mother in law taught me this oya, and its really simple and beautiful to make.  To achieve the best results, I suggest becoming familiar with the yillan kemigi oya before beginning this tutorial, as I have simple pictures and captions to explain what to do.  You can find the tutorial HERE

Now I know there are some people out there who will disregard what I'm about to say, but I'd appreciate if you have a little respect and not post these instructions to your website, blog, anything without linking BACK to me.  I've taken the time to teach you something, atleast be kind enough to acknowledge the person who taught you.  Thankyou :)


Chain one, take one bead chain one.


Go into the 1st ch and sc, slide another bead down close it and ch 1
Go into bead and sc, slide down bead and ch 1, turn and repeat
This is how Yillan Kemigi is formed, Now for the "eyebrow" part...
So we have what it looks like on the left.  After 4 beads in total, chain 8 and go into left side of 2nd bead from
your hook and sc. ch 1 and take a bead, go into ch and sc.  Do this 7 times.  The 7th bead will become
part of the yillan kemigi.  The step by step is below.

Ch 8, sc into left side of 2nd bead from hook.


7 beads over chain.Ch 1 and sc into far side of snakes bone (continuing the snake bone oya stitch.)  slide down bead
ch 1 turn and go into 7th bead of the "eyebrow"  repeat these steps.  You can leave as many beads in between motifs as you like, I normally leave 2 or 3.
 .

When your oya is long enough, chain 8 and dc into left side of 2nd bead from hook.  Ch 6 and repeat till end.


I hope this tutorial is to your liking.  I hope you all have a lovely day!

Friday, January 6, 2012

Free Crochet Oya Pattern..

2 Comments


So this is how this pattern came to life.  I was searching on the internet for like crochet fonts or something so I could write up a couple of patterns to put up on here or for sale or whatever, and I found this great blog that spoke of Adobe illustrator and even gave a 3 part tutorial on how to use the basics (
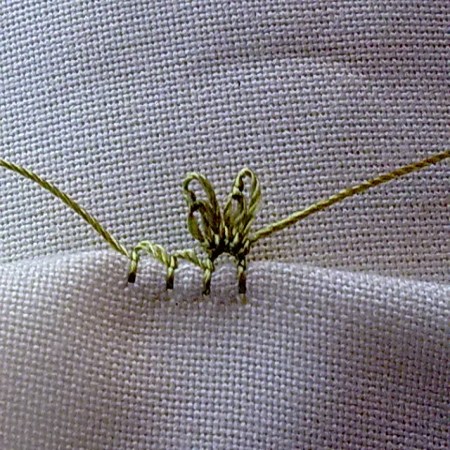
you can find the 1st part here) So I thought I'd give it a shot.  It took me forever mind you so for those of you who will be testing out this edging, you'd better be thankful lol.  Its not the most perfect, but I hope you get the basic idea.  I've done an example of this edging on my blog, only with beads and I said it looked like 7s, so if you want to look at what the oya should look like (minus the beads) then look here (obviously its the yellow one)  So yeah..try it out, let me know what you think, and if you want to repost the diagram anywhere, please remember that I spent ages trying to make it as best as a beginner can, so make sure you link it back to my profile.  Thankyou very much and have a wonderful day!  Oh and by the way:  I didn't know what you call a "wrap 4 times around hook" so just make sure you count 4 and then pull one through, then pull 2 by 2 through until you have one loop left.

Saturday, August 27, 2011

Some Oya Stitch Names

4 Comments

I've provided some stitches here, and a written piece (by me if you can't tell lol)  Of course there are many more stitches, which I'm sure you'll come across and learn just like I did 
Straight Legs

Rabbits Ears

Devils Legs

Parsley

Kucuk Yapragi


My array of Igne oyasi stitches that I've written down.  I have a full book of all my ideas to
do with Oya lace (needle, crochet, shuttle) Crochet patterns, Embroidery designs, its my
big book of ideas!
Related Posts Plugin for WordPress, Blogger...